Thursday 30 December 2010

Barry M Dazzle Dust

Barry M Dazzle Dusts are little pots of gorgeousness.
Every time I'm either in Boots or Superdrug, I tend to spend quite a long time by the Barry M make-up stand swatching the various dusts. They come in an amazing array of colours so picking a shade or two can be quite overwhelming.
Up to now I've only owned one dazzle dust in Bronze (nr 44) - when choosing I decided to opt for a "safer" more wearable shade.

I popped into Superdrug yesterday and they were having one of their 3 for 2 offers - hurray!
I decided to take the plunge and get 3 more dazzle dust pots. I use the phrase "take the plunge" as these dusts can be quite messy to apply and well...not for the sparkle shy.

The ones I got are - Tan (39), Toffee (24) and Gold Iridescent (27) - all very pretty and wearable shades.
Swatches (from left to right): gold iridescent, tan, bronze and toffee

It's best to apply them with a flat brush, packing the colour on after applying a primer. Also remember to tap excess product off your brush prior to application. I find that taking a bit onto your finger and dabbing it on works just as well if you're applying it onto your mobile eyelid. 
They're highly pigmented, beautiful and add lots of sparkle and sheen.

Do you own any Dazzle dusts? If so how do you like to wear them?

Tuesday 28 December 2010

Two hair products I'm loving right now...

Hope everyone's had a good Christmas and is feeling well and rested!
I'm so glad that it's not bloody freezing here today in Northern Ireland.

I wanted to do a post about two hair products that I've really been enjoying using over the past month or so.

The first one is Organic Root Stimulator Olive Oil Nourishing Sheen Spray which comes in a huge 455ml can. I'm not really all that into sprays and hardly ever tend to use them, however I was swayed towards getting this particular one mainly because it contains olive oil which I'm a sucker for...actually I'm a sucker for any products containing any sort of oils as I just love oils, period.
Here's what it says on the can:
Organic Root Stimulator Olive Oil Nourishing Sheen Spray is  a non- greasy sheen enhancer created to restore the hair's natural moisture balance. A blend of Vitamin E, olive oil and herbal extracts provide new life to all hair textures. This product is free of fluorocarbons and drying alcohols. Won't fog or bead like other sheen sprays. 

Boy do I love this spray. In fact I've turned into a bit of a spray fanatic. I love the scent of this spray, can't quite put my finger on it but it's light, fresh and has a sort of  "baby product" scent to it.
It gives soft, shiny and healthy looking hair, making it feel really moisturised.
Apparently make-up artists tend to use this spray on those occasions when they need to make the model's skin look super glossy. I've tried spraying it onto the skin and found that it gives it a really nice sheen without leaving any sort of greasy residue as it sinks right into the skin. I think that it's going to come in handy during the summer season for accentuating a tan.

Also from the Organic Root Stimulator range, I purchased the Olive Oil Heat Protection Serum.
Olive Oil Heat Protection Serum provides heat protection for hair. It helps to straighten the hair while shielding it from heat damage caused by using hot tools including blow dryers, curling and flat irons. Infused with Coconut Oil and essence of Olive Oil to add shine and moisture, Olive Oil Heat Protection Serum aids in leaving the hair silky, shiny and smooth. 


This serum has a nice consistency which isn't thick or oily but you do need to use with caution. The first time I used this was a big flop. I had washed my hair and applied a handful of this serum. I didn't dry my hair properly nor did I brush it before going to sleep - I don't really fuss over my hair too much.
The next morning when I woke up my hair was one huge oil slick! Unfortunately I needed to go out and didn't have the time to wash my hair again and so was forced to wear a hat all day long.
This incident led me to lay off the product for a while but I went back to using it with moderation and am liking the results.
The way I use it now is just putting a tiny bit onto the palm of my hand, rubbing the product between my hands and working it through my hair before blow drying. The result is a glossy looking shine.

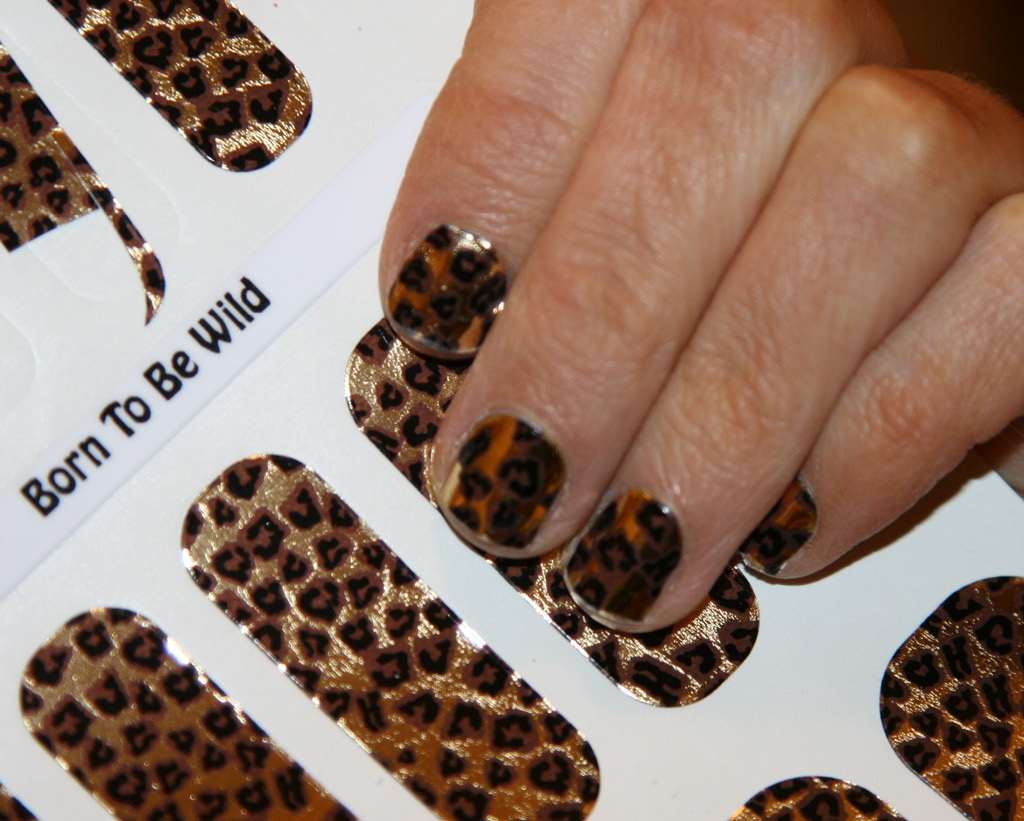
Trendy Nail Wraps Update

My last post was about Trendy Nail Wraps in Born To Be Wild. Just want to update that I've now had them on for 6 days and they're all still on and looking well! I do wear gloves for all my housework and when washing the dishes - I'm good like that:)
A friend of mine also mentioned that it helps if you put a top coat over them after application. I haven't got a top coat over but they're still holding on pretty well. I think that the key is to apply them to a clean, dry nail plate free of any oils or products that might act as a barrier.
Pretty impressed with the durability - wonder what all those people who said that they come right off were on about...

Wednesday 22 December 2010

Trendy Nail Wraps

I've finally got around to applying my Trendy Nail Wraps in Born To Be Wild. I'd assumed that application would be a pain but they were rather easy to get on. It took me approx. 20 minutes to apply them and this included cutting them into a shape that fits my own nail bed as most of the sizes were too big for my wee nails.

Application for wraps:
  • push back cuticles and shape the free edge
  • wipe clean nail plate (don't use any liquids or cleansers) 
  • select wrap that fits nail bed
  • heat adhesive side of wrap for 2-5 seconds
  • apply wrap on nail bed from cuticle to free edge and press down
  • trim wrap to free edge and then file and shape 
  • apply a thin coat of glue to free edge (this is optional) 
I did omit the last optional step of applying glue to the free edge - not really sure what sort of glue they're on about...

Anyway, here's how they came out:

I love how they look, especially the way in which they shine and glisten from far. I only applied them today so I can't really comment on their longevity but I'll be sure to keep you updated. I've heard quite negative opinions regarding their durability so I'm curious to see for myself.

Have you tried Trendy Wraps yet?

Tuesday 21 December 2010

No7 Limited Edition Mirror Ball Eye Palette

How gorgeous is this palette?
As usual No7 has come out with some limited edition goodies - all sparkly and glam thus keeping in tune with the festive season - and I decided to as usual snap up the eyeshadow palette.
The palette contains four shimmering eyeshadows which have a very glamorous glistening effect.
The pale pink makes for a great highlighter.

Have you purchased anything from No7's Christmas Limited Edition collection?

Tuesday 14 December 2010

E.L.F. Make-up brushes

It's good to finally be writing a post. I've been ill with the flu and spending most of my time in bed feeling miserable. Any strength I've had I've needed to use for preparing an assignment for college but luckily that's now done and dusted. I'm still feeling a little weak and lethargic due to a cough that's been daunting me for the past week - went to see the doctor today cause I've actually been hearing rattling sounds coming from my chest which freaked me out a little. I'm on a course of antibiotics so fingers crossed that I'll be back to my old self again in no time.

Anyway, about two months ago I purchased five make-up brushes from EyesLipsFace - the ones that I was particularly interested in were as pictured from left to right:
Blending eye brush & eyeshadow brush, both from the regular line and from the studio series - the eye contour brush, blush brush and powder brush.
The eye brushes from the regular e.l.f. collection were £1.50 each and the studio brushes are £3.50. Overall they're all amazing value for money.


Eyeshadow brush
Great for packing on colour. Picks up product well. The bristles are firmly packed together, soft and I like that the handle isn't too long. I use this one for applying colour either all over the lid or just onto the mobile eyelid.

Blending eye brush
I use it for applying eyeshadow to the crease and blending. It's soft and easy to work with. I have noticed a bit of shedding with it though. It seems as there's always hairs coming out whenever I pick at it - not a big deal though as you can't expect miracles for the price.

Contour eye brush
Super soft and great for applying eyeshadow to the outer v and along the crease.

Blush brush
I adore this blush brush. I like the fact that it's quite small as it allows you to have more control when applying blush. The almond shape of the bristles makes it particularly convenient for contouring as well.


Powder brush
Love it! It's like a flat topped kabuki and it's super soft. Great for applying powder to the face for the softest finish ever. This is the perfect brush for the application of my Chanel cream bronzer as it buffs it into the skin incredibly well and does not shed at all! I no longer need to lift irritating little brush hairs from my bronzer - happy days!

I'm very impressed with all five brushes and particularly the three from the studio series. I recommend that you give them a go if you haven't already as you can't go wrong for the price.
They are incredibly soft and there's been no shedding whatsoever!
I'm definitely going to repurchase another one of both the powder and blush brushes.

I've noticed that e.l.f. has also come out with a new range of bamboo brushes...have you guys tried them yet? Please let me know what they're like if you have.

Friday 3 December 2010

St. Moriz goes Dark

Look at what I picked up yesterday at the chemist's -
Yes! St. Moriz Instant Self-Tanning Mousse now comes in a Dark version - how great is that!?

I only found out about this yesterday so if you already knew about St. Moriz in dark then many apologies - it's a new discovery for me - a great one at that and I wanted to share...

Here they are side by side - the original and the dark:
Now I have the two bottles, love them both but shall probably be reaching for the dark one more often and stick to using it from now on.
St. Moriz in dark is the same formulation as the original. There's only a slight difference in the colour result.
The original St. Moriz gives a natural looking golden tan whereas the dark one leaves you with more of a deeper bronzed result.

I squirted some out on the palm of my hand so you can see the difference between them:
Original on the left & Dark on the right

By the way, I now have two big stains on the palm of my hand:)
Curious to know - have you tried St. Moriz in dark yet?

Tuesday 30 November 2010

New Blush Love

Things have been pretty hectic lately hence the lack of posts - I'm hoping to catch up on posting and following all your blogs.

Northern Ireland has been hit by the snow and winter chills. My partner took a picture of me doing the morning round at the birds' feeding station - here's a sneaky peek at my usual morning hair do:)
Now onto the main focus of my post - I've discovered a new blush that I'm absolutely and utterly in love with.
It's the No7 Cheek Tint in Peach Silk
No7's cheek tints are available in three shades - peach, rose and maple. Being crazy about peachy shades it's only obvious that it was my pick of the bunch. Whenever I swatched peach silk it was love at first sight and I bought it straight away without any hesitation.
It's a bright matte orange/peach colour which when blended out looks very natural on the cheeks. It is like a creamy version of MAC's Peaches or Illamasqua's Lover blush.
Creamy blushes are great for the winter season as they tend to add a bit of dewiness to the skin whereas powders can dry it out even more.
The colour of this blush is very buildable so you can achieve a natural looking flush or more of an intense colour pop - it doubles up as a lip colour too!
I'm wearing it here on both my cheeks and lips:
It's best to apply it with your finger tips as the heat from your fingers will help warm the product up and make it easier to blend out. I have also used a foundation brush for application and it worked a treat as well.
I have normal/dry skin and have found the lasting power of this blush to be pretty good on me. When applied in the morning time, I've found that I only need to re-apply around 5pm.
I apply it after I've applied my foundation and set with just a tiny sweep of loose translucent powder.

I'm so thrilled with this new find and will always repurchase this stunning creamy peach blush...might just need to grab myself a back-up...

Do you like creamy blushes?

Sunday 21 November 2010

Bioderma Sensibo H20 cleanser

Used by celebs, models and make-up artists worldwide, Bioderma's Sensibo H20 cleanser has definitely got a lot of beauty junkies stamp of approval.

And now it's got mine!
After hearing the fabulous mua Lisa Eldridge rave about it, I knew that this cleanser absolutely had to find its way into my life. Getting your hands on it here in the UK is a little difficult though and you'll only be able to purchase online.

I did a bit of internet searching and also learnt that this cleanser was available in quite a lot of pharmacies in Poland. Just my luck as my partner happened to be visiting his family there at the time of my "hunting down Bioderma" quest.

Onto Skype I went and provided him with all the relevant details and pictures of the product. A couple of hours later he e-mailed me a photo of it saying that it had been bought and was already packed away in his suitcase - now all I had to do was wait another couple of days to start using it. The people at the pharmacy had also told him that it was great stuff and sold like hot cakes.

I've been using it daily now for over a month and can't imagine life without it. Any friends going to France or Poland will hopefully now be doing me a little favour and bringing back a bottle or two back for me - fingers crossed.

The cleanser is odourless, fragrance and alcohol free and resembles water. It kind of feels like you're using a toner so it's also great for using it in the mornings for freshening up your face.
I remove make-up using cotton buds drenched in the solution. It's very gentle on the eyes and skin, leaving the skin feeling clean and not stripped.

If I'm tired and in a rush, I'll just remove all my make-up using this cleanser alone - it does a great and quick job of it - I love a time saving product!
If I have a bit of time on my hands then I'll usually use it for removing my eye make-up and follow up with another cleanser of choice, using Bioderma as a toner.

All I can say is that this one's for keeps and I'll always be sure to have it in my bathroom and kit.

Have you guys tried it yet?

Wednesday 17 November 2010

Cute Earrings

What do you guys think of these earrings which I got the other day from Freedom at Topshop?

I find them to be quite adorable -

Cute little lacy vintage looking bows which my partner reckons bare a resemblance to granny knickers:)
I guess he's kind of right but who cares...I still love them:)
...and then these adorable owls - (hopefully they'll make me appear smarter:))
Have you picked up any interesting accessories lately?

Monday 15 November 2010

E.L.F. Studio Line HD Powder

I hardly ever use powder for setting my own make-up as I have normal/dry skin and find that powders only make it look more dull and dehydrated.
Nonetheless, I was very keen on giving E.L.F.'s High Definition powder a go having heard many good things about it - and disappointed I'm not!

The powder is white, fine and feels light and silky. A word of caution - do not apply it with the powder puff included as you'll end up applying way too much product which will leave a white residue on the skin. I like to apply it with either a powder or kabuki brush, buffing it gently into the skin.

I use it to set my foundation, undereye concealer and cream blush. The powder blends well, disappearing into the skin and evening out the skin texture. It doesn't look cakey nor heavy.

I've been reaching for it on a daily basis and have incorporated it into my make-up routine as I find that it makes my skin look soft and fresh. It really does give a smooth and flawless finish to the skin. I've noticed that my face still looks "polished" at the end of the day and I reckon that it's down to the powder.

Have you tried it and what are your thoughts?

Friday 12 November 2010

Illamasqua Lover Blush

I'm still very much feeding my obsession of all things peach and apricot. A few weeks back I finally got my hands on Illamasqua's Lover blush which I had been drooling over for quite some time now.

Lover is a light pastel peach/apricot with a matte finish. The texture is neither chalky or powdery as can sometimes be the case with a matte blush. Blendability is superb and the end result leaves you looking fresh-faced and youthful.

Here's a comparison of Lover and Peaches from MAC: 
 
Swatches: Peaches (top), Lover (bottom)
Peaches is more of a true peach where-as Lover has a tiny hint of pink. Lover is also stronger and more vibrant of the two and needs to be applied with a light hand in order to achieve a subtle looking flush.
Love both these shades equally and would recommend them for everyone's make-up kits and complexions. 

What is your staple peach/apricot blush?

Thursday 4 November 2010

FOTD - a little bright

The other day I watched a video demonstration in which make-up artist Andrew Gallimore created two looks using No7's Colour Rebellion Palette.
I've had this palette for a while now and only ever reach for two of the colours - Purple Haze and Red Lead as I find them to be the "safest" of the bunch.
One of the looks which Andrew demonstrated was using the blue shade along with the purple - the result looked stunning on the model.
I couldn't wait to try it on myself and decided to go for it today as I'm going to be home bound all day long - just as well cause the weather's horrid.
In addition to this, I'm not really sure as to whether or not I'd be brave enough to actually leave the house wearing blue eyeshadow...it's not my usual shade of choice.

Anyway, here's how it turned out:


Here's a breakdown of the products I used:
Face:
  • Leichner Foundation in Blend of Beige
  • Garnier 2 in 1 Tinted Eye Roll-on on under eye area
  • Chanel Cream Bronzer as blush
Eyes: 
  • No7 Colour Rebellion Palette - Indigo Blue all over lid up to the crease; Purple Haze along upper and lower lash line
  • Avon Sonic Boost mascara
Lips: 
  • E.l.f. mineral lipstick in Runway Pink (adore it!) 
 What are your thoughts - do I manage to pull off wearing blue eyeshadow?

Wednesday 3 November 2010

Nail polish, art and wraps

I am currently training to become a nail technician and absolutely loving my course. This has led me to become a little obsessed about "all things nails". I received three £5 vouchers to use on any of Boots' No 7 products and  used all of them on nail polishes instead of make-up (shock, horror...):)

The colours I got are (from left to right): 
 No7 Stay Perfect nail colour in Milan, Spun Sugar, Totally Teal

Please pardon the state of my nails in the following pictures as my acrylic nails are in desperate need of infills which I will hopefully be getting done tomorrow. 

Milan (love, love, love this one!)
 
Spun Sugar

Totally Teal

I also popped into Sally's and got these nail art stickers which I can't wait to try:
...and Trendy Nail Wraps in Born To Be Wild:
I'll definitely post pictures and do a review of the nail wraps as soon as I've had a chance to try them out. I plan on applying them to both my finger nails and toes. Apparently they're meant to last between one and two weeks on hands and up to four weeks on toes.

Have you given nail wraps a go yet?

Sunday 31 October 2010

Beauty treats from Asda

I popped into Asda the other day for my grocery shopping and was sidetracked by some beauty related goodies as usual.
Asda had a special offer on Revlon's false eyelash range where you could get two sets of lashes for £10. I opted for getting the 2 pairs pack; hence 4 pairs of eyelashes for a tenner.
I haven't tried Revlon's falsies yet but they do look quite promising -

I got the Intensifying set:
and the Defining one:
Have you tried these? Any thoughts?

I also popped this rather intriguing looking scrub from n-spa into my trolley:

By no means was I in need of yet another scrub - I just simply took a sniff and there was no way I was putting it back on the shelf - into my trolley it went.
This scrub is sure to delight the senses of all fudge and caramel lovers. I know that I probably could have made it myself by mixing a couple of ingredients found within my kitchen cupboards but you know how it is...
Hot Butter Fudge Sugar Polish gently buffs away dull looking skin while leaving it feeling moisturised at the same time due to the added honey extract.
It's great as it's gentle (though not gentle enough to be used on the face) but gets the job done and indulges your senses at the same time - you'll be tempted to eat it. Another plus is that it rinses off easily so no irritating granules get left behind to make moisturising a pain.

Did you pick up any beauty treats during your last grocery shopping trip?

P.S. Happy Halloween to you all!!!